


Cooking bacon in the oven is the easiest, mess-free way to make a full pound of perfectly crisp, golden slices. No splatter, no flipping, just hands-off, evenly cooked bacon every time.

- Flavor: Oven cooking melts fat slowly for rich, savory flavor and a perfect crispy bite.
- Skill Level: Foolproof! Even beginners can master this.
- Prep Note: I line the pan with parchment paper or heavy-duty foil for easy clean-up.
- Recommended Tools: There is no need to babysit or flip bacon over; simply bake in a rimmed pan.
- Serving Suggestions: Serve it for breakfast, add it to a BLT sandwich or burger, or crumble it over a salad.

Choose the Best Bacon!
- American Bacon is the most common type of bacon, which is strips of pork belly. Flavored bacon (like maple or peppered) is great oven-baked, too.
- Thick-Cut Bacon works well in the oven. This bacon is cut about ⅛” thick, so it will need a bit more time.
- Turkey Bacon is a bit leaner and requires less cooking time in the oven to ensure it doesn’t dry out.

Holly’s Pro Tips
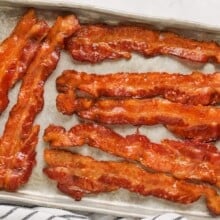
- While you can use a wire rack or cooling rack on the sheet pan, I prefer to bake the bacon slices directly on the baking pan. It will crisp nicely as it bakes in its own fat.
- Arrange the bacon in a single layer, without overlapping, for even cooking.
- For a big batch, use two baking sheets, rotate them halfway through, and add a few minutes to the cooking time.
- Adjust cooking time slightly based on your desired level of crispiness.

Storage
Leftover bacon can be kept in the refrigerator for up to 4 days or frozen for up to 2 months. You can use bacon right from frozen; it thaws in minutes.
Easy Breakfast Favorites
Have you made this crispy oven bacon? Leave a comment and rating below.

How to Cook Bacon in the Oven
Follow this easy recipe to cook perfectly golden-crispy bacon every time!
-
Preheat the oven to 400°F. If desired, line a rimmed baking sheet with foil or parchment paper for easy cleanup.
-
Arrange the bacon slices in a single layer on the prepared pan.
-
Bake for 12 minutes. Check on the bacon and continue cooking for an additional 6 to 8 minutes* or as needed until crisp. Thick-cut bacon will need extra time.
-
Use tongs to transfer the bacon strips to a paper towel-lined plate.
-
If desired, allow the bacon fat to cool for 10 minutes and reserve in a jar for cooking.
- *Be sure to check the bacon early. Cooking time can vary based on the pan used as well as the brand of bacon.
- Store brand bacon is often cut very thin and can sometimes cook faster than national brands. Check it early!
- For easy cleanup, line a rimmed sheet pan with aluminum foil or parchment paper before adding the strips of bacon. No baking rack is required.
- Ensure the bacon slices are in a single layer, overlapping pieces won’t crisp as well.
- If you’re making larger batches of bacon, use two pans and switch the placement of the pans after about 10 minutes. You may need to add a few minutes of cooking time.
- Keep leftover bacon in the fridge in an airtight container for up to 4 days. Reheat in the oven, in the microwave, or the air fryer.
Calories: 230 | Protein: 6g | Fat: 21g | Saturated Fat: 7g | Cholesterol: 36mg | Sodium: 365mg | Potassium: 109mg | Vitamin A: 20IU | Calcium: 3mg | Iron: 0.2mg
Nutrition information provided is an estimate and will vary based on cooking methods and brands of ingredients used.
© SpendWithPennies.com. Content and photographs are copyright protected. Sharing of this recipe is both encouraged and appreciated. Copying and/or pasting full recipes to any social media is strictly prohibited. Please view my photo use policy here.


