

Online courses have become one of the most powerful ways to share knowledge, train employees, teach students, or even build a business around your expertise. With the right structure and tools, anyone can create a course and deliver it to a global audience. But while accessibility and scalability are clear advantages of online learning, they also come with a challenge: keeping learners actively engaged.
To solve such an issue, many learning instructors opt for interactive courses. This type of course encourages learners to think, respond, apply what they’ve learned, and stay involved throughout the journey. Whether it’s through quizzes, activities, feedback loops, or group discussions, interactive elements can transform a passive learning experience into one that truly sticks.
In this article, we’ll explore practical and creative ways to add interactivity to your online course, helping you boost learner engagement, satisfaction, and outcomes.

Photo from Pexels
What Is an Interactive Online Course?
An interactive online course is one that contains lots of interactive elements that boost student engagement. This includes quizzes, widgets, multimedia content, 3D models, and more. Compared to a regular or static course, an interactive one is far more effective and encourages active learning. More specifically, this type of course can help students truly achieve their learning goals and acquire useful skills.
To help you develop your own interactive course, we’ve split this article into five stages. We’ll start with preparing the educational materials and compiling them into one course, then we’ll cover the later stages of publishing and marketing it to the right audience.
Stage One: Preparing Your Course
The prospect of creating and launching your own course can be quite exciting, but don’t rush into it without a plan! Before you start the creation process, you need a solid foundation on which you can build your course. Here’s how you can create such a foundation:
1. Carefully Choose the Topic of Your Course
To create an online course, you first need to decide on your topic. While you could technically choose any subject you like, there are a few good practices to follow that can increase the course’s chances of success.
Below are a few pointers that can help you choose the right topic for your course:
- Make sure you have enough knowledge and expertise to teach the course’s topic. This can be shown through qualifications, practical experience, personal growth, or other achievements related to the subject area, all of which build trust with potential students.
- Identify your target audience and do your best to understand who you’re creating the course for. This can be done through researching their education, work experience, and personal interests. This step is crucial to figuring out the appropriate level of detail to use in your course material.
- Aim to solve a real problem that your target audience is facing. The most successful courses address specific challenges. Understanding the source of their problem and researching existing solutions that they’ve tried is key. Your online course will offer a valuable new skill, enabling them to overcome this problem.
- Talk to potential learners, and find out what they want to gain from this online course. This way, their responses can help you shape a course that’s both relevant and highly valuable.
- Understand how students look up this topic on search engines. You can do this by using a keyword research tool. This can be helpful for determining the popularity of your chosen topic in search engines. In addition, this step can help you confirm interest in your subject and optimize your course for search visibility.
💡Pro Tip: If this is your first time creating a course, start by working on a smaller one by choosing a very specific topic to teach. Once you have more experience creating and selling educational material, you can then move on to larger and more ambitious programs. This approach will increase your chances of creating a top-quality educational course without risking burnout or spending over your budget.

Photo from Pexels
2. Determine the Learning Outcome of the Course
As you choose your topic, make sure to think about the benefits your students will gain from the course, which are also known as the learning outcomes.
A well-crafted learning outcome is a concise paragraph that:
- Summarizes the main goals of the course.
- Gives students a clear idea of the curriculum.
- Highlights the value of enrolling.
Because of its usefulness for prospective learners, you can add this paragraph to the landing page of your course.
A learning outcome that captures students’ attention generally includes the following three elements:
- The skills they’ll gain from the course.
- The knowledge they’ll acquire as a result of completing it.
- Their new attitude about the problem they want to solve.
Using the points above, try writing a learning outcome for your own course. Feel free to use the template below for inspiration:
By the end of this program, you will be able to [SKILL] with the help of [KNOWLEDGE], and you will feel [NEW ATTITUDE] about [PROBLEM].
Let’s look at an example of this template. Below is the learning outcome for a course about using Kotobee Author to create interactive ebooks:
By the end of this program, you will be able to create an engaging, interactive children’s ebook in Kotobee Author [SKILL], where you will learn to use the program’s many tools and features [KNOWLEDGE]. You’ll also gain the confidence to produce ebooks quickly and effortlessly [NEW ATTITUDE ABOUT PROBLEM].
3. Outline the Content of the Course
Once you have your learning outcome, it’s time to outline the contents of the course. Since you’ll mainly be teaching actionable skills and their relevant theories, make sure your outline reflects this goal.
Start by splitting the course into modules, and within each module, organize the material into individual lessons. You’ll end up with a bird’s eye view of your course, which can help you estimate its total length.
From there, you can plan out the learning materials you’ll need, which can include:
- Engaging learning materials (videos, quizzes, infographics, etc.)
- Unique selling points that make your course stand out (interactive workbooks, 3D models, or real-world case studies)
💡Pro Tip: Don’t just recreate what competitors offer. Ask: What can I provide that’s more practical, interactive, or visually compelling?
After your outline is ready, you can begin creating lesson plans, each with its learning outcomes and the needed educational materials. With these in hand, you can save lots of time when you start working on the content of the course.
Stage Two: Choosing Your Authoring Software and Creating the Course
Now that you’ve chosen your topic and identified your target audience, it’s time for the exciting part: building your course. To do that, you’ll need a powerful, intuitive authoring tool which has all the features you need. To keep things simple, we’re going to walk you through the course creation process using the award-winning software, Kotobee Author.
1. Download and Install Kotobee Author
The first step in creating your unique course is signing up for a free Kotobee Author account, then downloading and installing the software.
2. Import an Existing File or Choose a Course Template
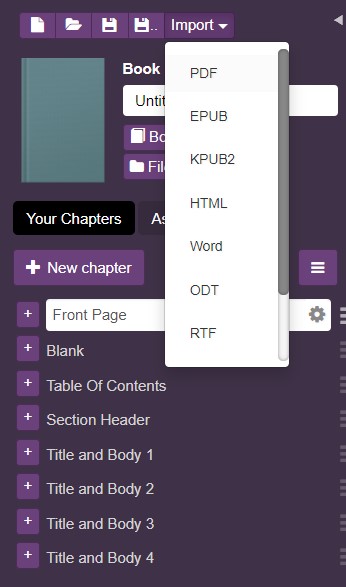
When you open Kotobee Author, you will have two options: create a brand-new course from scratch or import an existing one. If you choose to import existing files, just head over to the “Import” tab and choose the files you need.
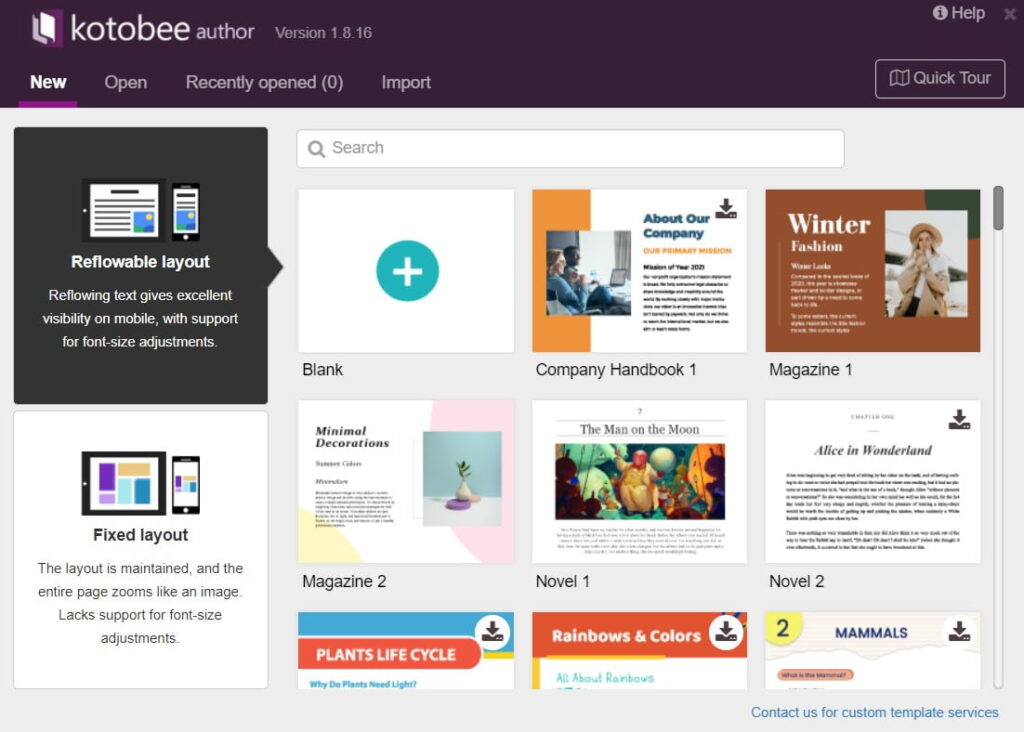
Alternatively, you can create your course completely from scratch. All you have to do is select a template that suits your needs or create a blank course file that you can customize yourself.
💡Pro Tip: Make sure to try out Kotobee Author’s AI content creation tool, which can generate text, images, or even quizzes in a matter of seconds!
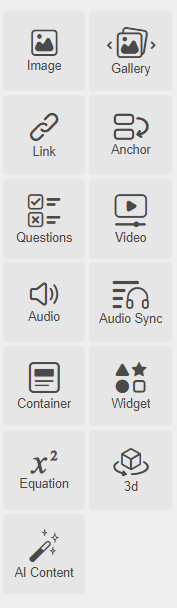
3. Start Adding Interactive Content
The next step is to start adding the main hook of your unique online course: the interactive content! This can range from a slideshow of images all the way to complicated 3D models and book apps.
If you don’t know what types of content to add, check your outline and determine the best ways to explain each part. For example, a lesson about writing the education section of a CV can be supplemented with video tutorials and a quiz.
4. Choose a Few Mini-Apps to Add to the Course
Finally, you can take the interactive content one step further by taking advantage of Kotobee’s built-in Mini-Apps. Unlike traditional widgets that need to be imported and tied to specific lessons, these ready-to-use mini-apps are accessible anywhere in your course. They function as portable learning tools that students can revisit when needed.
Better yet, mini-apps can serve a variety of purposes. For example, imagine embedding an interactive calculator that works across every module of a math-intensive course. Alternatively, you can try adding vocabulary flashcards for learners to access whether they’re on Chapter 1 or Chapter 10.
Want to take a look at an example of an interactive course? Then check out our sample below!
Click to view the online course sample!
Stage Three: Publishing and Selling Your Course
Now that you know how to create an engaging and interactive course, let’s talk about your publishing options. With Kotobee, you have so many to choose from. Plus, you can easily monetize your course and minimize the risk of plagiarism.
Are you intrigued? Then let’s take a look at how you can publish your course with Kotobee.
1. Export and Publish Your Course
With your course polished to perfection, it’s time to publish it to the world! To get started, you can choose to export your course in certain formats, each with its own advantages. So, let’s examine Kotobee’s export options so you can determine the right one for you.
Below are the best ways to publish your course using Kotobee:
- Kotobee Cloud: Kotobee Cloud is the best option for publishing a course without worrying about managing your hosting service. It also allows you to control who can see or access the content of your course.
- Kotobee Library: If you aim to publish a collection or a bundle of courses, you can use Kotobee Library. This allows you to combine individual courses into one branded library, which you can then embed on your website or export as a downloadable app.
- SCORM Package: If you have an LMS, you can export your course as a SCORM package as well. That way, you learners will be able to access the course directly without having to leave the LMS.
- Website/Web App: By exporting your course as a web app, you will be able to easily embed it on your own website. This will allow students to access it by simply visiting your webpage, which can increase its traffic and overall engagement.
- Mobile & Desktop Apps: In addition to online web apps, you can turn your course into a standalone Android, iOS, Windows, or Mac app. These can be useful for offline learning as well as syncing learning progress across different devices.
- EPUB or PDF Ebooks: Finally, you can export your courses as regular PDF or EPUB ebooks for offline learning. PDFs do not support interactive content such as ebook apps and widgets, but they’re small-sized and easy to share. Meanwhile, EPUBs (EPUB3 in particular) support interactive content and have grown more popular over the years. For extra security, you can export your course in Encrypted EPUB, which is password-protected and only opens in Kotobee Reader.
2. Monetize Your Course
After exporting the course, the next step is to set up payment methods. For the purposes of this article, we’ll talk about the main monetization options you have with Kotobee Cloud.
There are two main ways you can accept payments for your content using this service:
- As soon as you sign up for Kotobee Cloud, you’ll find the settings to monetize your course from within Kotobee Author. With this option, you will receive 100% of the revenue for every sale.
- If you have a Shopify store, you can integrate your account with Kotobee and sell the course directly from your store.
- If you have a WordPress website, you can use the WooCommerce or Memberful plugins to easily set up pricing plans for your online course.

Photo from Pexels
3. Set a Pricing Plan for the Course
You might think at first that you can only charge high prices for long courses, but this isn’t always the case. After all, the price of the course should reflect its value to your students, not its length. This is why you might find a 4-module course that costs upwards of $300!
So, how can you set a competitive yet profitable price for your course? Well, there are a few good practices that can guide you:
- Examine the competition: Looking at how others are pricing similar courses can help you figure out a reasonable range. For instance, your competitors might be charging around $100 for their project-based courses. If many students are enrolling in them, it can be a sign that the pricing is competitive.
- Consider the value of your course materials and the cost of production: Adding higher-value material to your course means you should raise the cost of accessing it. For example, you can charge more than your competitors if you offer unique insights, methods, or educational materials. And naturally, you should factor in the cost of creating those materials as well.
- Understanding the financial background of your target audience: Not all learners have the same financial capabilities. So, do some research on your target demographic before you set a price. Try to understand their professional background and estimate how much they would spend on online learning. By doing this, you can keep your course profitable without making its price inaccessible to your audience.
Stage Four: Protecting Your Content from Theft
Keeping your course protected from piracy and plagiarism is quite important. After all, you should be compensated for your hard work without having to worry about it being stolen! So, let’s quickly learn about two protective measures you can take to secure your course.
1. Copyrighting Your Course Materials
Why would you need to register your course as copyrighted material? The short answer is that this legal process adds a layer of protection to your content. Once your course name and its materials are copyrighted, you will have the option to file a copyright lawsuit if someone uses them in unauthorized or illegal ways.
2. Adding Extra Security with DRM
Are you worried that anyone who buys your course might later resell it or distribute it illegally? Then don’t forget to set up some DRM security! DRM tools can help you prevent unauthorized copying, sharing, or downloading of your content. Depending on the platform, these protections may include disabling copy-paste, restricting screen recording, limiting access to registered users only, and setting expiration dates for access.
Stage Five: Market Your Course
You’re just steps away from enrolling your first students, so let’s explore how to find them! There are two phases within this stage: the initial launch, and the post-launch phase.
1. The Launching Phase:
First, let’s think carefully about the course launching process. Here is a list of strategies to help you launch your course successfully:
- Connect directly with your audience. Talk to people within your target demographic via the platforms they use most, such as LinkedIn groups or online forums. Before you tell your audience about the course, make sure to build rapport by engaging with them, answering questions, and offering helpful insights. Then, start reaching out to prominent figures in the community. Given your history of helpful contributions, these figures will be more likely to take action when you tell them about your course.
- Announce the release date of the first module of the course. You can do this on your website, through your social media accounts, and in your newsletter if you have one. Better yet, add a deadline for signing up, after which the sign-up page will close. This can motivate your audience to take action and not miss out on the unique benefits of your course.
- Host live Q&A sessions and interact with your students throughout the launch. These opportunities can strengthen your relationship with your students, which increases their satisfaction with the course. As a result, they’re more likely to recommend your course over others simply because it is much more interactive.

Photo from Pexels
2. Post-Launch Phase:
To keep students coming in beyond the initial launch, don’t forget to invest in post-launch marketing as well! Below, you’ll find a list of great tips to get started with this phase:
- Create social media channels for the course: Having a social media presence on websites like YouTube and Instagram can go a long way toward marketing your course to interested learners. For example, you can make use of YouTube Shorts, which are one-minute snippets, to introduce the topic from your curriculum. Similarly, you can use Instagram to create targeted video ads.
- Set up a mailing list: Every successful online business can benefit from a newsletter, and your course is no different! By creating and setting up a mailing list, you can add the email of any new students to it and keep them updated on the latest news about your course.
- Create free content or offer discounts to go with course purchases: Everyone loves freebies, and online learners are no exception. Therefore, a great way to increase your sales is to offer bonus materials with the course at a greatly reduced price, or even free of charge. For example, you could offer exclusive resource kits like downloadable templates, or worksheets. Just make sure to highlight these benefits on the course landing page so students see the added value they’ll be getting!
- Ask for student testimonials and reviews: This is one of the most important tips on the list. This is because potential students are more likely to trust a review left by someone who’s already tried the course themselves. So, make sure to dedicate a section of your course’s landing page to a few glowing testimonials!
- After a couple of weeks, evaluate the financial success of your course: The revenue from your course should be higher than the expenses that went into creating it. Though you might have other metrics for measuring the course’s success, it’s also important to consider how profitable it is.
Final Thoughts
Creating an online course can be quite fun, especially when you’re adding exciting interactive content for students to enjoy. By using the cutting-edge tools at your disposal, you can create a competitive, value-packed, and entertaining online course today that will benefit your learners and help you make some profit.
And if you would like to see some real-life examples of courses created using Kotobee Author, check out this case study to discover how creators have used interactive features to revolutionize their online courses!
.
Read More
How to Apply Interactive Training in the Workplace
How to Make an Audiobook in 5 Steps (and the Best Types of Books to Start With)